Course outline
Lesson 3: Siting your Clarity devices
By the end of this lesson, you’ll know how to:
- Site your Clarity Node-S.
- Site your Clarity Ozone Module.
- Site your Clarity Wind Module.
Siting Your Clarity Devices
Each Clarity device has specific siting requirements. Read through the Siting Guide below before you conduct your site surveys to identify the exact mounting locations.
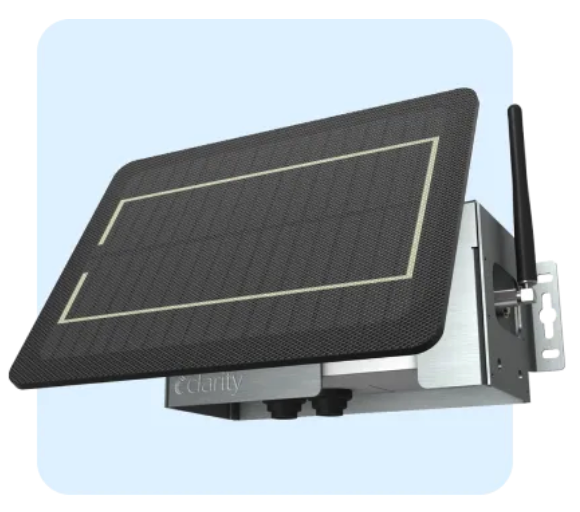 The Clarity Node-S.
 Once at the site, you must identify a mounting location. The node can be secured to a pole, fence, or railing using zip ties or hose clamps. The Node-S can also be wall-mounted. An appropriate mounting location will need to:
- Be a pole, fence, or railing in which the device can be secured using zip ties or hose clamps
- Be at least 6 meters (20 ft) away from any obvious pollution sources like an exhaust vent, generator, or outdoor grill,
- Allow the air inlet/outlet to be facing down and unobstructed to allow for adequate airflow. Ideally, you would have >270° of free airflow around the inlet. There should be no less than 180° free airflow,
- Ideally, the monitors would be placed away from buildings to allow for greater airflow. If you need to install the monitor on a building surface, place it on the upwind side of the building,
- Allow for mounting at a height of approximately 3-5 m (10-16 ft) from street level to measure general population exposure; higher to capture data on more regional air quality,
- Be in a secure location, if possible behind a fence or in areas that aren’t highly trafficked,
- Allow for enough sunlight to charge the device if using the solar panel. It’s important to check that the location is not in the shadow of buildings, trees, or other infrastructure. The device and solar panel must face south (northern hemisphere) or north (southern hemisphere).
- Use a free solar angle calculator like this one to find the optimal angle for your solar panel.
- For the Node-S to operate on its default sampling frequency, it needs an average of 1 hour of sun each day. This does not have to be spread evenly (i.e. you could have four hours of sun on one day rather than one hour over four days). A fully charged node will be able to operate for approximately 17 days without any sun exposure.
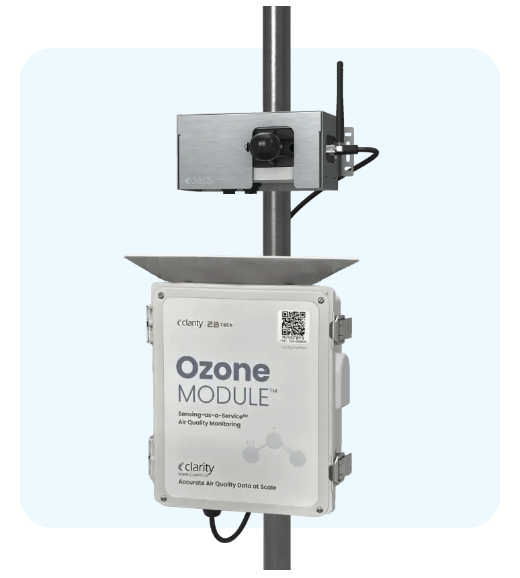
Ozone Module Siting Guide
The ozone module placement should ultimately be based on the goals of the project, but a few things should be kept in mind for ozone monitoring:
- NOx titrates ozone, so if the monitor is placed in an area with sources of NOx the measured concentration will be lower than in nearby areas farther from the source of NOx.
- Ozone is scrubbed by vegetation such as trees and bushes, so adequate distance between vegetation and the monitor should be maintained.
- The US EPA has guidelines for siting ozone monitors that address the above considerations in Section 7 of the Quality Assurance Handbook for Air Pollution Measurement Systems and in United States’ Code of Federal Regulations Appendix E to Part 58 - Probe and Monitoring Path Siting Criteria for Ambient Air Quality Monitoring.
Siting Distance Guidance
When monitoring traffic-related air pollution, the number of vehicles on the roadway plays a role in how close the Ozone Module should be. Refer to the chart below for recommended distances.
Distance from Roadways
| Vehicles Per Day |
Minimum Distance (m) |
| 1,000 | 10 |
| 10,000 | 20 |
| 15,000 | 30 |
| 20,000 | 40 |
| 40,000 | 60 |
| 70,000 | 100 |
| 120,000 | 250 |
View the full guide on our Knowledge Base.
 The Clarity Node-S paired with the Clarity Wind Module.
Wind Module Siting Guide
The Clarity Node-S + Wind Module needs to be sited properly to provide valid wind data:- The Wind Module needs to be installed at a site in an open area. It must be clear of obstructions for at least 15m in all directions.
- Avoid installing next to trees and tall buildings. Ideally, the wind module should be installed as the tallest object in the area, 2m or higher in the air.
- Avoid installing next to a high-power radar or high-power radio transmitter to limit interference.
- Ensure the solar panel receives enough direct sunlight for at least 1 hour daily to keep the device charged.
- To ensure accurate compass readings, align the triangle mark on the casting to the TRUE NORTH.
- The triangle is found on the module’s side, as shown in the picture below.

Close-up of the Clarity Wind Module.
The NOAA CrowdMag app (available from Google Play for Android devices or the App Store for iOS devices) provides a quick way to get location-specific declination. While you may also use the CrowdMag app’s compass functionality, we recommend only using the app for obtaining the appropriate declination (via either the Compass or WMM tabs at the bottom) and using that declination with a high-precision compass.View the full guide on our Knowledge Base.
For additional support planning your project and siting your devices, contact your Clarity Project Manager or support@clarity.io.